How to Change MAC Address in Android Devices – Termux community
To find the interface name for your WiFi network, you’ll have to install the appfrom this link http://petty.link/qyyLSN . Once you’ve done that, just follow the steps mentioned below:
- Open the Terminal Emulator app, and type the following command:
ip link
- A whole lot of information will get printed out to your screen, simply scroll down to the bottom, and check the value for which the “link/ether” value matches the MAC address of your WiFi. In my case, it’s “wlan0“. For most modern devices, the WiFi interface name will be “wlan0”, but in some cases it could be something like “eth0” as well.
CHANGE MAC ADDRESS WITH TERMINAL EMULATOR
Now that you’ve figured out the interface name for your device, you can go ahead and change the MAC address to a new value. To get a random MAC address that you can use, just head on over to any random MAC address from this site http://petty.link/aXlM . Once you have the new MAC address you want to use, just follow the steps below:
crossorigin="anonymous"></script>
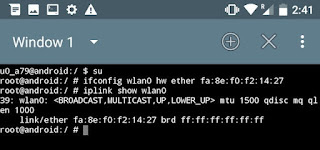
- Launch Terminal Emulator for Android, and type the following command:
su
This will get you superuser access on your Android device. You will require a rooted device for this.
- Next, type:
ifconfig [interface_name] hw ether [new_mac_address]
Hit enter, and your MAC address will have changed.
- You can confirm the change in your MAC address, by running the following command:
iplink show [interface_name]
Note: I tried various MAC address changing apps for non rooted devices, but either they asked for Root access (weird), or they only supported devices using MediaTek processors.


Comments
Post a Comment